I just spent 3 days at a mixed media workshop taught by my friend Nancy Barch. It was in Easton, MD, and the three of us from here who went as students stayed at some friends' house about an hour away from Easton. The workshop was a blast and so was the eating and visiting at Cheryl and Paul's house.
Here's what I did, in the order I did them (more or less). They're small images here but will get much bigger if you click on them. I invite critiques and suggestions.
This is full sheet size and will probably be cropped or mined for smaller paintings but I don't know how yet.
I've already cropped this but it may get some more. Collaging over and under the gold paint.
I don't like this one so it will get something done to it. It's mostly tissue paper glued to a half sheet then painted over. The darks are collaged over the tissue.
Most of the class was a bit lost doing the non-representational work the first day so Nancy did a demo of abstracted flowers. This has paint first, then collage and some pastel to make the checkerboard. Fun but a little too cute.
This is unfinished. I started with lots of texture on plain paper mostly made with white collage and heavy, textured gel medium, then slopped paint all over. There was such a deep puddle that I threw a length of waxed paper over it to take up some of the color. Waxed paper with color put on it like this makes wonderful collage paper. But with this one I liked the look of the waxed paper over it so I stopped there. I'll glue the waxed paper down around the edges and then see where I want to go next.
Nancy does wonderful monochromatic work so she did a demo of what she does to get the gray backgrounds. The woodcut-looking collage in the middle here is waxed paper again, this time laid over wet black gesso then picked up. It's been living in my collage box for ages waiting for the perfect spot. The hard part of these is the restraint it takes not to add a lot of color!
Several layers of collage over paper with a wash on it. On the top I printed the net-like look by painting some rug hooking scrim and using it like a stamp. There's more work to be done here.
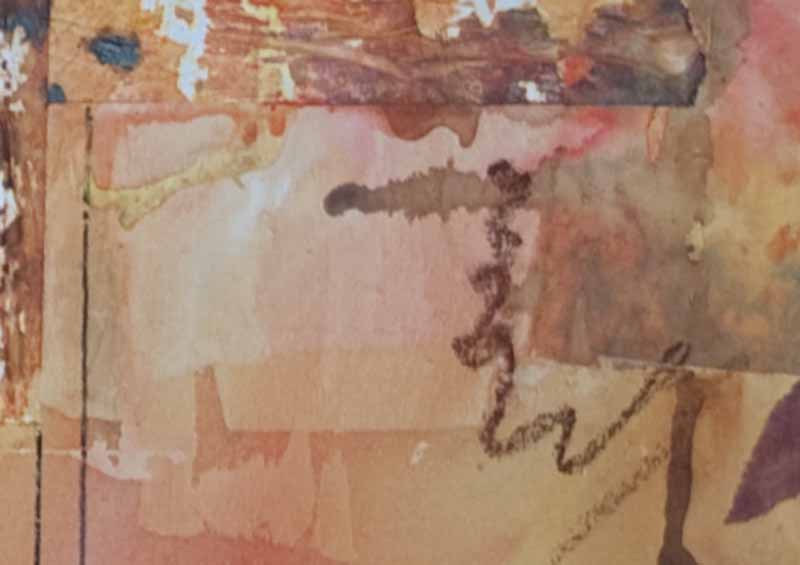
For the texture on this one, I used gesso rather than the gel medium. Before it was completely dry I floated some black ink over the whole thing, mixing in a bit of blue. Then it looks like I used waxed paper again to pick up some of the ink that didn't soak into the gesso (after three days of this work it's hard to remember exactly what I did). My next step will be to blacken all around the shape and probably collage some more solid paper into the shape. Or not. Depends on what inspires me at the time.
Nancy has a friend who does incredible silk screening and he gives her test pieces. She uses, and shares, the test pieces of backgrounds. So that's what's the delicious gradation in the background. I threw on some collage pieces (painted tissue and waxed paper) then it was time to clean up and come home. I've given you two versions here. The first is the whole sheet and the second is cropped. Which one do you like and why?